Sunday, October 14, 2012

Jacob's 4th birthday, Superheroes!


    I don't do huge birthday parties with tons of kids and games. No gift bags. Just the same few friends and family, some simple decorations and a great cake. You can click on the pictures to see them bigger. 


Basic idea of the theme was superheros. Nothing to fancy or over the top though. 


The "leap tall buildings in a single bound" or "Gotham City" City scape in the back is simply two pieces of  black posterboard. I accordion folded them, cut the tops into different shapes and used a foam brush and grey paint for the windows. It was really fun to do and cost under two dollars to make. 


The flag-banner-bunting-garland took a little longer. I bought two comic books at good will for $.70 each, and one roll of red grosgrain ribbon. With my paper trimmer and tape runner this took an hour or so to make. I absolutely love it.  I see more of these in my future as the possibilities are endless. :) 


I downloaded some mask templates off the internet. I cut them out and traced them on foam. I have a desk job, that gets very slow sometimes, and these were assembled there.  A  hole punch, scissors,  some elastic cord ($1.99 at the craft store)  and some colored  foam sheets is all it took. i free handed the lightning bolts and stars and some stripes. Kids loved these, Great instead of the traditional party hat! 


Some quick cutout kerplunks, pow, bams and kabooms and you have cupcake topers! 


The cake took a little time and a HUGE bag of M&M's. But once you get a rhythm  going, really not a lot of work. Just time. And patience. Lots of patience. :) 


Four  layers of yumminess!! 


Simple. Inexpensive. Creative. Exactly what a party should be! 


Tuesday, October 2, 2012

Homemade Kit Kat Bars


I have mentioned these classic bars several times in the past few months in conversation and have been surprised to hear that no one has even heard of them! When I was a kid these were always at picnics and family get together. A great summer no bake treat, not  that I only make them in the summer!They are called Kit Kat Bars I assume because of the crunchy layers. I don't think they taste anything like them. Or like anything else really. They are very rich and sweet. And awesome. :-) 


The recipe is as follows-

- about 70-75 Club or Waverley crackers

- 2 sticks of butter

- 2 cups graham cracker crumbs

- 1 cup packed brown sugar

- 1\3 cup granulated sugar

-  1\2 cup milk

- 2\3 cup creamy peanut butter

- 1\2 cup semisweet chocolate chips

- 1\2 butterscotch chips


And then I just wanted to praise my aluminum Nordic Wear cake pan. It also is what you would have seen on all the tables and camping trips when I was a kid here in Wisconsin. It's lite weight. Deeper than most pans of it's kind. The metal lid is nicely raised allowing even more space, won't crack or melt. And just looks retro rad. :-) 


Line the bottom of the pan with crackers. No need to grease it. You may have yo break a few to fit. 

Melt butter in a saucepan, stir in sugars, Graham cracker crumbs, and milk. Bring to a boil and stir continuously for five minutes.


Spread half of the mixture on the crackers, add another layer of crackers, the rest of the mixture then a third layer of crackers.

Melt the peanut butter, chocolate and butterscotch chips in a smaller saucepan or in the microwave, stirring often. Once it is melted and well combined spread over the top layer of crackers. 

Chill in the refrigerator for at least thirty minutes before cutting.


Walk outside. Love that it is seventy degrees and the trees on your street are starting to put on a beautiful show in October. :-) 


And then round up the kids and eat half the pan! No these really are sweet. This was the next day. They are different than anything out there, give them a try!

Friday, September 21, 2012

Lego Table

Have you ever noticed if there is a pile of  Legos laying around, that just about to anyone will play with them? Universal fun for all ages, my kids ages 17 to 3, boys and a girl will be play with them for hours.

So I decided to put together a place to play with and store the hundreds of Legos we have collected over the past fifteen years.


I had everything available on hand. ThThis lack end table I stole from my oldest bedroom. It's a $7.99 table from Ikea. There 15 inch Lego board, spray adhesive, tape measure, some tape, and a piece of chalk, Sandpaper, newspaper and white paint.


First I centered the board on the table using the tape measure to be sure I had the same distance on each side left over. Then traced around it with a piece of chalk. I removed the board and scuffed up the table with the sandpaper. I also scuffed up the back of the board. 


Then I taped it off with tape and newspaper. I sprayed the table and back of the board heavily with the adhesive. Make sure you get it lined up properly because it's very tacky and won't allow you to adjust it. 


I used some weights and a container of kitty litter to hold the board down. It took over twenty four hours for the board to be secure. Then I taped off a section halfway between the edge of the board and the table. Yes. I used duct tape. :-) 


And this is what you think get. A place for Legos in the middle and for cars on the edges. 


Cute, easy, fun! Try it! 


Thursday, September 13, 2012

Hall Built Ins Overhaul


I am not the most organized of people. I would like to be. Things lined up, labeled, color coded, planed and scheduled make me incredibly happy! I can spend hours in Ikea, The container store, and the rubbermaid aisle at target.

For  example, when I bring groceries home, all packages are opened and put into containers. Then all the unfortunate waste and garbage is disposed of at once. I get a clear view of what we have and how much. No deceptive empty boxes lurking in the back of the cabinet.

Here is an example of what the snack cupboard looks like.


See how pretty? Really just opening this cupboard makes me happy. Organized spaces are calming for me.

However, everyone has their junk drawers right? That place stuff goes when it doesn't really have a home. I have more of a closet. That has gotten so out of hand I now just open it up throw things that in and quickly shut the door before things fall back out!


I had to do something! My house was built in 1939. And it's been project after project gently tugging it into this century. The hallway on my main floor is the only place on this floor where the old orangish, varnish hasn't been painted yet. It's on the list. The very long list. Good thing I love lists. :-)

So here are a few of the before pictures.


Really. If you can't find it, its in here. Even if you can't find it, and you look in here and still can't find it......it's probably still in here!


I had a Kindle. I couldn't find it. For six months. I looked in here. A lot. This is a deceptively deep and intricate web of items. That perfectly hid my Kindle for 6 months. 


I had won a Nook Touch at work.......so I didn't look REALLY hard. But you would not believe my surprise when  I found it! 


Candles, games,cards, party supplies, window insulating kits.....two of them,  some unopened toys,  blank cds, batteries, anything broke that i was "going to fix" all in here. And so so much more. 


The top one not so bad. Dusty. Too high to reach. :) Sand box bucket? 


Hairbrush? Tape gun....two of those too. Coloring books, notebooks, bags, Halloween decorations that didn't make it back to the attic........


You get the sad sad point. 

So I did something about it!! 

  
It was tempting to just leave it empty. It was very.....Zen. :) 


Alyssa and Alec helped remove the hardware  so I could paint. 


I Like to get them involved and teach them as much as possible. The more they help, the more they tend to appreciate things as well I think. I wish I would have gotten some in between pictures. Something very satisfying about paint going on. Paint. I love paint. :)


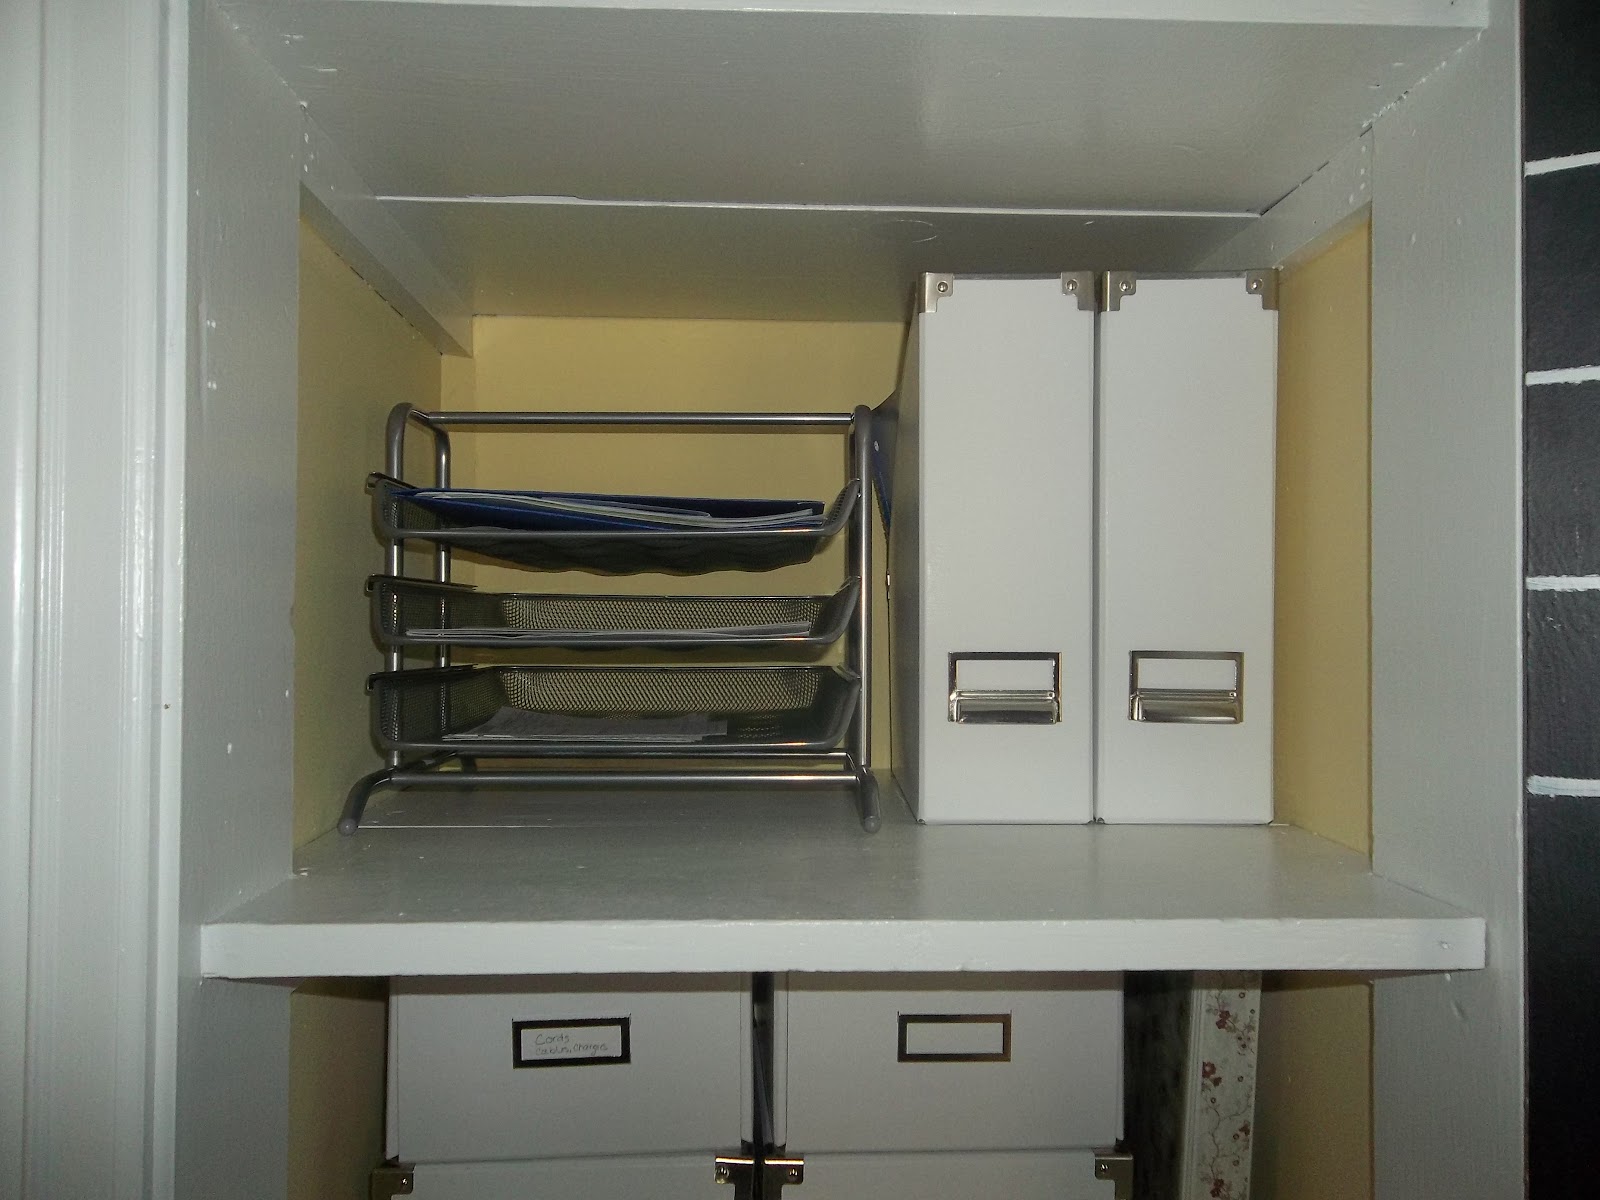
Painted the inside a luscious butter yellow that did not win in the race for kitchen walls, but I LOVE LOVE LOVE anyway. and painted out the trim and shelves white. And added a spiffy chalkboard calendar to the inside of the door. Taped off and painted the lines and used some Memory Makers White rub on letters for the days of the week. Left over room for notes and doodles. 


White boxes and magazine boxes from Ikea  are perfect! 


The bottom drawers are just for Notebooks, coloring books and some of the kids craft supplies. And the top drawer is stacked two deep with Ikea cutlery treys for the more normal "junk drawer sort of things.


The bottom tray is lesser used things, some tools, stapler, batteries, my label maker.


sticky notes, chalk, pens, pencils,  markers calculator in the top....but my handy Label maker is still accessible! :) 

So that's my makeover "command center" A place for everything and everything in its place makes me a happy lady! 


Wednesday, September 5, 2012

Jacob's Jet-Pack

   So for whatever reason, one I can't seem to really pin down,  I've decided to start this blog. Just a place to share the family photos and achievements. To ramble and maybe occasionally rant.  To be a show off and jump up and down like a kid in preschool yelling "Look what I did! Look what I did!"

   However, where to begin? Well......"Let's start at the very beginning, a very good place to start......." If you at least know what song starts that way, we're headed towards a beautiful friendship! In my world the year begins in September. January feels like the middle. August, very much like the end. Today, My three oldest children headed off to start the new school year, another great reason to start today, three fewer interruptions! 

  And What to begin with? Other bloggers with whom I've chatted said just jump in! eventually it all falls in to place and makes some sort of blog world sense. Pinterest has been inspiring. the goal being to DO not just PIN. So I went back to the very first thing I had ever  pinned, and it was an idea for a fun homemade jet-pack. I'd been meaning to make this thing for my youngest son Jacob (four later this month)  And one day last month I just did. IT was a lot of fun, more work than I had counted on and worth every second. He loves that thing more than most of the toy's I have spent ton's of money on. 

    So here it is, Jacob's Jet-Pack.


   I used two 1.5 liter bottles, cardboard, hot glue, crepe paper in red, yellow and a little blue, metallic spray paint ( I used brushed nickle because it's what I had on hand, It's amazing what i always have "on hand",  and duct tape. The only difficult part was trying to figure out the length for the straps. 


He Flew around for hours


Volume is a little loud with a big noisy truck going by, so turn it down if you watch! 


The "flames" are a little tattered now, he doesn't even seem to notice. Just loves to fly around. And say's "Thank you Mama, I love my cool jet-pack you made for me." Nothing beats that.  :)